Pages

Tuesday, June 25, 2013

Strawberry Day!

Towards the end of last week, the kids decided they wanted to come up with some themed day ideas of their own.  Dylan was quick to say she wanted to have a Strawberry Shortcake day (which we changed  to a Strawberry day). Jackson wanted a Pirate day, and since his next birthday party will be Jake & the Neverland Pirate themed, I thought we could get in some good practice for that and maybe even sneak in a few decor ideas that we can use later on for his party.  Zaine decided he wanted to have an Indiana Jones day complete with watching one of the movies (and just skipping past the scary parts).
So needless to say, I spent the last few days searching on Pinterest, trying to find some fun ideas at little to no cost, which just so happens to be one of my favorite things to do.

So today, our theme was "Strawberry Day"
Although our day started a bit later than originally planned, due to the thunderstorms, our first bit of business after running a few errands, was to head out to a local strawberry patch. I went online and found two that seemed pretty popular with friends of mine, Skelly's Farm Market & Susie's Garden Patch. We ended up trying out Skelly's Farm Market today but we'll also try to stop out at Susie's sometime this summer and check it out.

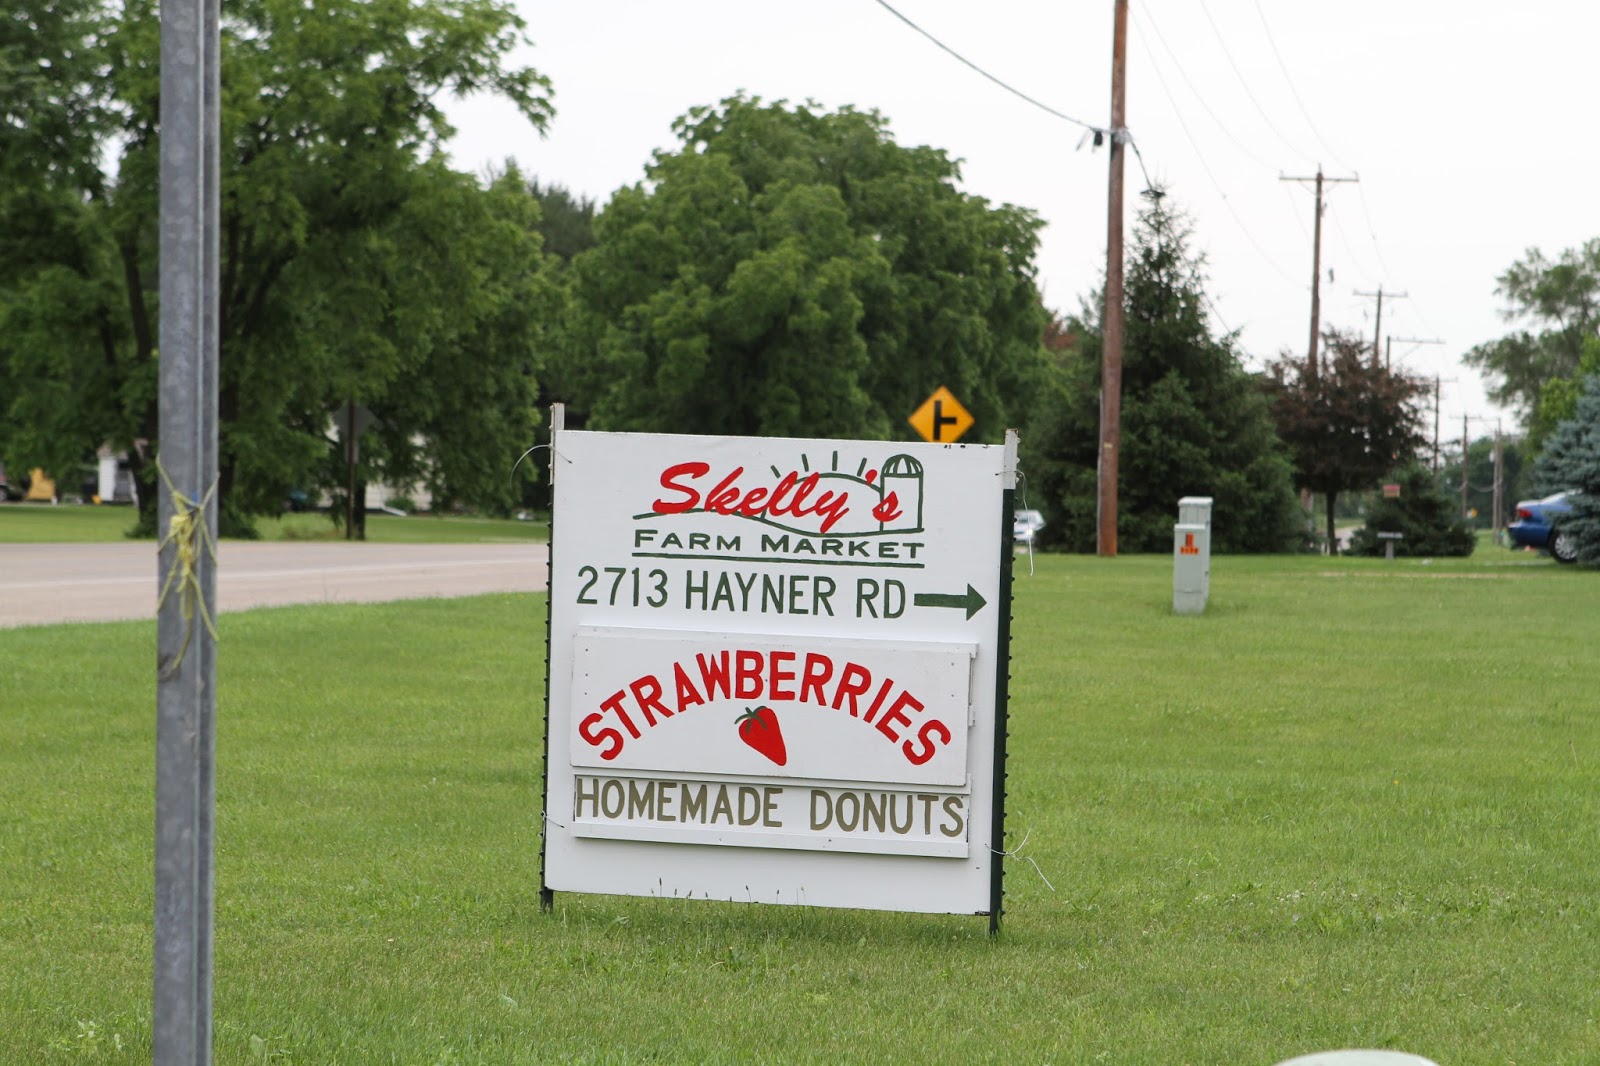
Once we arrived I was a bit nervous that we wouldn't get to head out into the fields because of all of the rain we received, but luckily we weren't disappointed. Since we couldn't drive our car out into the fields because of the rain, they personally drove my 3 kids and I out to the field in their "Gator". Needless to say this was probably the highlight of the day for them, especially Jackson, the look on his face was priceless! He really felt like we were on safari and he was bouncing in the back of a jeep. In fact on the way back he decided he was Indiana Jones and made a gun out of his hands and shot all of the bad guys.

The kids did a great job only picking from our designated row and we all had a really great time.  After picking a couple of pounds worth of strawberries, we headed back to the play area.  My kids loved the wooden pirate ship, castle and barn.  They played for a good bit before coming inside to enjoy some fresh, homemade strawberry donuts.  And I won't lie, I could have ate an entire dozen all by myself! They were so delicious! 


 Overall it was a great experience for them and for me. And even if you just came out to pick strawberries, they are only around $1.50 for a pound. We picked a couple of pounds and the total price came to just over $3.00, not bad for a fun day out!

We will definitely be heading back out there again soon. And I'm looking forward to seeing all they have to offer during the fall!

Once we got back home, we were quick to make some Homemade Strawberry Ice cream.  Last year I tried a very simple recipe from KevinandAmanda.com and made her chocolate chip version. Crossing my fingers that this version will turn out equally yummy :)


Dylan and I made a few different strawberry (and other fruit inspired) cards that we will be sending out this week.  Dylan loved creating our own Scratch 'n' Sniff cards! You can find an easy tutorial here.


Then Zaine and I made Strawberry Applesauce (recipe found here). He was such a helper and really felt proud of himself once it was all done. It turned out incredibly yummy! We will definitely be making a bigger batch soon!


And that pretty much sums up "Strawberry Day" We were going to pick up a book that my daughter had read a few years ago, The Little Mouse, the Red Ripe Strawberry, and the Big Hungry Bear by Audrey Woods.. but we never made it out to the library with all the other running we did today. 

Tomorrow's theme will be Jake & the Neverland Pirates (picked by Jackson), should be a good time!

Pin It!

Thursday, June 6, 2013

Summer Fun with the kids! Day 3: Lazy Summer Day!

So far the first few days of summer vacation have been a blast! Monday we had Rainbow Day, Tuesday was Fun with Eggs Day and yesterday was a Lazy Summer Day (I decided early on that it is important to have at least one day during the week where we have no specific plans for the day) hence, Lazy Summer Days.

On Tuesday (Fun with Eggs Day) we had a good friend of Zaine's over to spend the afternoon with us. We made boiled eggs, had fun drawing faces on them and then the kids had a big egg hunt in the yard.  After coming inside we made deviled eggs with a Dr. Seuss twist, and then the kids took turns reading Green Eggs and Ham by Dr. Seuss. Later on in the day when they were winding down, we put in an older Alvin and the Chipmunk Mystery of the Easter Eggs dvd that we had picked up from the library.

Yesterday, we ended up doing quite a few different things.  First we decided to go to a local park and bring Max with us, needless to say he was thrilled :) First we went on a walk around the park and then played on the playground before we headed back home to drop Max off. 

We made stops at the library, McDonald's (we decided it would be a good day for .75cent ice cream cones). Then headed back home for some more fun.

We made a DIY sprinkler that I had found on Pinterest.com. Basically you poke a bunch of holes in an empty 2 liter bottle and attach it to your hose using duct tape. Although it wasn't the warmest outside, and the fact that it was actually sprinkling the most of the morning, the kids were determined to try it out.

To be perfectly honest the DIY Sprinkler wasn't quite a success. We found the only way to get the water shooting up was to jump on it... so that's what we did!  Then after awhile the kids decided it would be fun to give each other "a shower" with it.  The above picture of Jackson is him showing me how brave he was! Won't lie, the water was pretty cold!
Seeing how Max was in need of a bath, we gave him a very quick one inside before going in. Since I knew we would have to give him a bath yesterday, I had picked up a book from the library that I thought would go perfect for the day " Harry the Dirty Dog by Gene Zion.
(I absolutely LOVE Max's ears when they get wet! His fur is so crimpy!!)

So all in all, another successful day :)
Pin It!

Tuesday, June 4, 2013

Summer Fun with the kids! Day Two: Fun with Eggs!

Yesterday was Day One of my kids summer break. We spent the day doing rainbow crafts & activities.
Melted Crayon art
Making our own Rainbow Play-doh - Which gave us the chance to pull out all of our old play-doh toys that we haven't used in years.
Tree paint (just mixing equal parts of flour & water, and then adding some food coloring). Max also appreciated this activity! 
Rainbow Cupcakes - These turned out amazing! I ended up using only a spoonful of each color per cupcake.
Then Zaine & Dylan took turns reading Genesis 9 and the meaning of rainbows. 

 Overall, the first day of Summer break was a success!

Here is the inspiration sheet for Day 2 of Summer Break, Fun with Eggs!

What fun plans do you have this summer?


Pin It!

Tuesday, May 28, 2013

Summer Fun with the kids! Day One: Rainbow Day

Next year, my youngest son Jackson, will be in full day Kindergarten.  So this is the last Summer I have before all three of my kids go back to full day school.  My mommy heart isn't taking it all to well.  So in order to smother spend as much time as possible with them until the next school year starts, I'm determined to have a fun filled summer this year.  Dedicated to spending more time, more quality time, with each of them over these next few months.

With spring/summer being my busiest time photographing families & weddings, I knew I would have to start planning early on in order to be prepared for the first week of summer.  A few years ago, when Zaine & Dylan were younger, and Jackson was just a baby, I used to follow a blog that really inspired me!    http://www.notimeforflashcards.com/ 

Of course this was way before Facebook and Pinterest, and before most people followed blogs religiously.  What I loved most about the blog, was that she used everyday items that you most likely already have in your house, to create fun filled days for toddlers.  She would always include a craft/activity and recommend a book to go along with the subject of the day.  Since we are huge fans of our local library, this made most days activities 100% free, which is right in my price range!   So my goal this summer, is to have an activity/craft/treat/book & movie all based around one subject for each day of the summer (leaving a few days off here and there so that we can truly appreciate some lazy summer days).  This of course will also only be from Monday-Friday leaving weekends to family time and allowing me to still schedule photo sessions throughout the summer.

I'm currently narrowing down our activities for a small "Welcome, Summer!" party that we will be having when the kids get home from school on Friday. Hopefully I will get a chance to post those details later this week. But for now, I have gotten everything together for our first full week of summer and thought I would share my inspiration with you!

Our themes for our first week are as follows:
Monday - Rainbows Day
Tuesday - Despicable Me/Egg Fun Day
Wednesday - Lazy Summer Day
Thursday - Post Office Day
Friday - Bike Adventure Day

Our first day will be this upcoming Monday. And this is the inspiration sheet I came up with to show all of the fun ideas we'll be doing.

Rainbow Day:
Homemade Play-Doh - http://www.thehandmadehome.net/2013/02/the-best-homemade-play-doh-color-intro/
Rainbow Trees - http://ohboylefler.blogspot.com/2013/03/sidewalk-paint-and-signs-of-spring.html
Cupcakes - http://www.wilton.com/technique/Layering-Cupcake-Colors?cmp=pint2013&icid=0109layeringcupcakecolors


Not only will these ideas help entertain my kids this summer, but it will also give me an excuse to try out some of the fun things I've found on Pinterest.com and check them off my Pinterest Bucket List.   And doing it all with an extremely small budget of under $10 a week (not an easy task for a family of three kids), will be a good test on how creative I can be with using supplies we already have here at home.

So for the first day of Week 1, our total cost came to $2.50 (Cake mix $1 and Frosting $1.50) everything else we already have here at the house.  I also made sure to reserve "The Magic School Bus Makes a Rainbow" book & DVD earlier this month, online at our library, so that we would have it waiting for us to pick it up.


Pin It!

Friday, February 3, 2012

Valentine's Day card ideas


I'm sure you've seen these all over the Internet.
I saw them over on Pinterest.com a few months ago (then again in last month's Family Fun magazine) and decided it would be a perfect idea for my kids valentine's day cards this year. So after doing a very quick photo session with each kid I printed off these pictures over at SeeHere To make your own at this amazing price ($1.50 total for 20 cards w/envelopes shipped) just visit this link over at Frugal girls


Since I had gotten a few extra cute shots of Jackson during our photo session, I decided to make a couple of cards using some other ideas from Pinterest. These will be for his teacher and Daddy.


(It's a little hard to see, but he has lipstick kisses all over his face in the second picture).


Isn't he just the cutest!


Melody :)
Pin It!

Wednesday, February 1, 2012

A few little things I've been working on.

I've been trying to build up my dining room decor little by little on a small budget. So a few weeks ago I made this burlap table runner (inspired by Pinterest of course).
Pretty simple, just attached two pieces of burlap together in the middle added some pleated ends and painted 2 black stripes down the sides.
Nothing fancy, just something simple (which is just the way I like things).

Materials:
*Burlap (2yds depending on how long you need it)
*Black acrylic paint
*Scissors
*Hot glue gun (I usually try to avoid sewing when possible, so I actually hot glued the two pieces together in the center and the pleated pieces on each end.
************************************************************************************
Now with my daughter's baking birthday party coming up in March, I've been needing to work on a few projects that I can incorporate with her party but still be practical to use at home afterwards.
So since I had decided that one of the activities at the party will be having each girl decorate their own small individual cake. I realized I needed to make a cake stand for each cake to sit on while they decorate them and then later to display them.
So after finding a few different ideas on Pinterest, I set out for the Goodwill store over the weekend.
*SIDE NOTE*
I'm starting to wonder if Pinterest.com and the Goodwill store are in correlation? Most of the materials needed to create items on Pinterest, can be found at The Goodwill and Salvation Army stores. It is definitely imperative that I go in there with a certain amount of cash and a time limit!

OK, back to the cake stands. I found a set of 8 candle holders w/ tops, and 8 white small dessert plates all for $1 each. So I snatched those up, and after picking up some E6000 from Michaels I created these...

I had originally planned to paint both the plate & candlestick with white spray paint so they would look more unison, but I think i like them the way that they are.
What do you think? Should I leave them like they are or decorate them more?
Melody

*POST SNEAK PEEK*
Tomorrow I'll be posting pictures of the Valentine's the kids will be handing out this year and a few other Valentine related items... so stay tuned :)
Pin It!

Friday, January 20, 2012

Command Hooks... How did I ever live without you?


Within the last few months, I have found several different uses for those little 3M Command hooks you can find at Walmart & Target.


My original plan was to purchase a set, so I could hang up a chalkboard I made from a metal square I found at Hobby Lobby & chalkboard spray paint. I wanted to hang one up on the front door, that I could write little Christmas/winter sayings on throughout the season.


Very simple (which is the way I tend to like things), but pretty. It looked very nice at the center of our door with all of our Christmas cards from friends around it.


Since I had purchased a package of 4 hooks (with 8 adhesive strips), I now had 3 hooks left to put up somewhere. I had been wanting some kind of wall hooks for my kids to hang their own coats up on for quite some time now(something at their level). But I wasn't to thrilled about having it right at the front door for everyone to see (I like things to be as clean/simple as possible). So I had the idea to put the 3 hooks on the inside of our front closet door. This ended up working out perfectly! The three hooks are just inside the door (which makes me happy), right at their height level so they are now able to hang up their own coats!! And since the hooks are put up using the adhesive strips, there was no damage to the door (which is a good thing since we live in an apt) and when we are ready to move they will come right down without leaving any residue! This was the perfect solution for our coat problem, and I have to say it has been working perfectly!


So now I've used all the hooks in my package, but I still have 4 extra adhesive strips left over.. no problem! Thanks to Pinterest.com, I've had no problem coming up with a few ideas on how to use them. Using a wooden magazine holder (or I suppose you could use a sturdy plastic one), and 2 Command adhesive strips I was able to create a spot under my bathroom sink (just inside the door) to put all my daily hair tools (blow dryer, straightener, brushes). This was a great solution for me, mainly because I loathe cords strung all over the place!

Using the last 2 adhesive strips & two empty plastic peanut containers (thanks to my hubby), I came up with a quick and easy storage solution for our new silverware. We were able to pick up some nice new silverware the day after Thanksgiving at a great price. But due to our space limitations in our apartment, I was having a hard time finding a somewhere to put them. Since these will be our "nice dinner, special occasion, holiday" silverware (not everyday), they didn't need to be in a drawer. Just somewhere accessible for when I did need it. So going along with the "inside the door" phase I'm currently going through. I decided to put it in one of our lower kitchen cabinets. I put these up quickly (so I could show you a picture) and I still need to put up the third one that hold the knifes, but here it is so you can get the idea. I still need to remove the original labels from the containers, and I'm thinking about adding a small chalkboard oval onto the front of them (using a stencil and chalkboard paint).


Again, nothing spectacular but very helpful for my everyday life!


So there you have it, a few helpful organizational ideas using 3M Command Hooks.
Thanks for stopping by!


Melody
Pin It!